Latest Entries »

Wow. It has been THREE AND HALF years since I updated this blog. Remember when I was going to update DAILY? Well clearly that happened. Ha. Ha. Ha.

My last entry was, Will I Ever Post About The Watermelon? and as you can see, I have not, and it has been over three years. Does this mean I don’t want to? No, of course not. I can’t even say that MOVING is an excuse, because to be honest, it’s totally not.

But I really need to update this, I have done a fair amount of cool baking projects SINCE I last updated this thing, I just have never bothered to update this. My fault. Totally my fault (I mean who else’s fault WOULD it be? This is solely MY blog) and I really need to do better.

I think since I I made that last blog, I even made a remake of that cake, and I still have yet to update this thing. I have good intentions, but I just never actually post. *Sigh* Failure. That’s what I am when it comes to this blog. A FAILURE.

But let’s see – what did I last talk about anyway? *consults blog* I talked about the fact that I moved from Plymouth, Michigan to Houston, Texas. I still live in Houston and in fact, in the same apartment. You know – there’s that. So why haven’t I updated ANYTHING? No excuse. Honestly don’t have a real reason other than I forgot, I am lazy, I was unmotivated… the list could go on.

But probably the biggest reason I don’t update, I just don’t bake that often because my kitchen is small and annoying to use and move around. I don’t know HOW I managed to cook full blown Thanksgivings out of it, it’s that small. Oh that’s right, I have to use the floor to hold used dirty dishes (hey, they are dirty and I have NO COUNTER SPACE or sink space).

Having fed you all these excuses – I am HOPING to update this thng again. With a real life update and real baking updates. But we will see. At this rate, it’s probably going to be 2021 before I post again, Hahaaaaaaa, I kid kid kid, kinda.

I hope I am kidding.

Until next time –

Jessi

Someday – someday I tell you – I will be better at updating this blog. Someday….

The title of this post is referring to the fact that I mentioned that I made this Watermelon cake, and that I would post about it – and that’s happened. Of course I made this cake LAST summer which makes it an OLD old post. My bad. At least I think it was summer – in any event, it was really hot out. I need to make that cake again.

The intention of this blog entry is to simply give an update on me. Boring, I know, not nearly as exciting as when I make something. Speaking of which, I made White Chocolate Macadamia Nut Cookies for my sister. Because she’s a cookie NUT. She’s like a Jessi-Made-Something-Sweet nut really.

Back to my point. My last post was made from Plymouth, Michigan, but this post – I’m making it from my new home in the City of Houston, in Texas. That’s right. I HAVE RETURNED HOME. Texas has, for as long as I can remember, always been consdered my home, you know, to me. My heart always wanted to return back to Texas – it’s where I belong. It’s where my Dad’s family is.

Sadly, about a month after we got here, one of my two favorite aunt (the other one being on my Mom’s side) died. She was my dad’s sister, his older sister, and she was sooo nice. I got to see her once before she died, and we were supposed to see each other the weekend she died. I miss her. She was one of those people who deserved the world, but didn’t have much, but considered that the world, because it was all they needed. A remarkable lady, gone far too soon, and I miss her and wish I had had more time with her before it happened.

But that’s what this about, talking about the big change in my life, moving from Michigan to Texas. I have not been to the ocean yet, but you can bet your buttons the first chance I have teh money I’m going. Last time I was there was in 2008, so it’s overdue.

Until next time –

Jessi

I was not too keen on making this cake, but I found it in one of my FoodNetwork magazines, and I happened to mention it outloud to my mother and she was like, “Oooo, that sounds good.” And I was like, really? Doesn’t sound like my cup of tea, but I forgot, my mother likes peppermint. So for a second opinion, also forgetting what a candycane freak my sister is, I asked her if she wanted me to make it and she’s like, “YEAH!” Geez. Okay. I’ll make the freaking cake – but I’m not eating it.

IMAG2362

Peppermint Layer Cake with Candy Cane Frosting

Wooooooooo, did this cake have a peppermint punch when you SNIFFED it, let alone tasted it. For the record, I never ate a full slice, just a bite or two. My sister and mom ate full slices though, and I don’t know how they managed. I mean if you love peppermint, it was proably a very yummy cake. But I’m adding chocolate next time. And fixing the frosting.

I don’t know exactly what, but I have an idea, it had been a long time since I made a frosting like this one, so it turned out… strange, I guess. My sister wasn’t a big fan of it. And if I had a better kitchen (and if you follow my blog, you konw my complaints about my kitchen) I would probably have made this frosting again on a smaller scale and worked on it. However, I don’t, so I don’t know what I’ll do next or this Christmas. They like the cake cake part, but the frosting needs work, apparently. I didn’t really try it so I don’t know. Like I said, not a big fan of peppermint.

Okay. Here’s the recipe out of Food Network Magazine, December 2013 issue.

Peppermint Layer Cake with Candy Cane Frosting

Ingredients:IMAG2389
For the cake:
1 1/2 sticks unsalted butter, at room temperature, plus more for the pans
2 cups sifted cake flour (sift first, then measure), plus more for dusting
1 1/2 teaspoons baking powder
3/4 teaspoon salt
3/4 cup whole milk, at room temperature
1 teaspoon vanilla extract
1/2 teaspoon peppermint extract
1 1/2 cups sugar
3 large egg whites, at room temperature

For the frosting:
1 1/2 cups sugar
1/2 cup light corn syrup
6 large egg whites
Pinch of salt
1/2 teaspoon vanilla extract
1/2 teaspoon peppermint extract
1/4 cup crushed candy canes, plus more for topping

Peppermint Layer Cake with CandyCane Frosting

Peppermint Layer Cake with CandyCane Frosting

Directions
1 – Make the cake: Position racks in the middle and lower thirds of the oven and preheat to 350 degrees F. Lightly butter three 8-inch-round cake pans and line the bottoms with parchment paper; butter the parchment and dust with flour, tapping out the excess. Sift the flour, baking powder and salt into a medium bowl. Combine the milk and the vanilla and peppermint extracts in a small bowl; set aside.
IMAG23902 – Beat the butter in a large bowl with a mixer on medium speed until smooth, about 1 minute. Gradually beat in 1 cup sugar, then increase the mixer speed to high and continue beating until light and fluffy, about 5 minutes.
3 – Reduce the mixer speed to low and add the flour mixture in 3 additions, alternating with the milk mixture, beginning and ending with the flour mixture, until just combined. Scrape down the side of the bowl, then increase the mixer speed to medium and beat until smooth, about 5 more minutes.
4 – In a separate large bowl (using clean beaters), beat the egg whites with a mixer on high speed until foamy. Gradually add the remaining 1/2 cup sugar and continue beating until stiff, shiny peaks form, about 6 minutes. Using a rubber spatula, gently fold the whites into the batter in 3 additions until combined.
5 – Divide the batter evenly among the prepared pans. Bake, switching the position of the pans about halfway through, until a toothpick inserted into the center comes out clean, about 20 minutes. Let the cakes cool 10 minutes in the pans, then run a knife around the edges and invert onto racks to cool completely. Peel off the parchment. (The cakes can be made up to 1 day ahead; wrap in plastic and store at room temperature.)
6 – Make the frosting: Fill a medium saucepan with 1 to 2 inches of water and bring to a simmer over medium-high heat. Combine the sugar, corn syrup, egg whites, 2 tablespoons water and the salt in a heatproof bowl and set over the saucepan (do not let the bowl touch the water). Whisk until the sugar dissolves and the mixture registers 165 degrees F on a candy thermometer, about 8 minutes. Remove the bowl from the pan and beat with a mixer on medium speed until soft peaks form, about 5 minutes. Increase the mixer speed to high and beat until fluffy and cool, about 4 more minutes. Add the vanilla and peppermint extracts and beat until combined, 1 more minute.
Assembly: Place 1 cake layer on a platter and spread 1 cup frosting on top; sprinkle with about 2 tablespoons crushed candy canes. Top with another cake layer, spread with 1 cup frosting and sprinkle with another 2 tablespoons crushed candy canes. Top with the final cake layer, then frost the top and side of the cake with the remaining frosting. Sprinkle more crushed candy canes on top.
IMAG2373

I really need to post these things right after I make them, because then I can tell you what went wrong and how to improve it. But now, five months after I made the thing… or has it been four? Five, four, whatever, point is I can’t remember much. I do remember the cake and the frosting together was very minty and too much for me. But by themselves, either was good. I think I might try doing a peppermint cake with a chocolate additive to the frosting, or a drizzle of chocolate, something to just lesson the peppermint just enough.

DON’T put your candy cane sprinkles on the top until right before serving or the sugar content melts together. Other then the frosting being too… marshmellowy it turned out well I think.

That’s all for this post, sorry I don’t have enough, what I would have done different, but it’s just too hard. When I make it again, I’ll post a new one and tell you more.

Until next time,

Jessi


To be quite honest – I made these cupcakes so long ago, I can’t remember ANYTHING about what I did to make the actual cake part, just the frosting. If my memory serves me correctly, I might have made them simply because I was trying out a new frosting recipe and the cake may actually be Betty Crocker chocolate cake mix. But I really can’t remember.


Chocolate Cupcakes with Blue Buttercream Frosting

Chocolate Cupcakes with Blue Buttercream Frosting

I do remember how unhappy I was with the texture of the finished buttercream, although the flavor was AMAZING. I’ve remade the same buttercream and had the same texture, but was slightly better than before, although I did not take pictures of  those cupcakes.

Choclate Cupcakes with Blue Vanilla Buttercream3As I’m almost positive I did use a store bought mix for the cake part, I’m just going to give the buttercream recipe.

VANILLA BUTTERCREAM

Ingredients:

  • 1 cup milk
  • 5 tablespoons all purpose flour
  • 1 cup butter
  • 3 cup confectioners’ sugar
  • 1 teaspoon vanilla extract

DirectionsChoclate Cupcakes with Blue Vanilla Buttercream4

  1. Stir milk and flour together in a saucepan over low heat; cook, stirring constantly, until thick, about 5 minutes. Cool mixture in refrigerator until cold to the touch, about 15 minutes.
  2. Beat butter, confectioners’ sugar, and vanilla extract together in a bowl until light and fluffy.
  3. Stir cooled milk until smooth. Slowly beat into the butter mixture until frosting is of a spreadable consistency. For a thicker icing, you may not need the entire milk mixture.

Note: Make sure the butter is still slightly stiff, and not completely soft, this will make a difference. But also make sure it’s not to hard, or you’ll get lumps of butter in your frosting.


For best results, I think next time I make this, as I’m STILL testing out this recipe to get the proper texture I want in Choclate Cupcakes with Blue Vanilla Buttercream1my frosting, I’m going to make sure everything is as cold as I can get it when mixing and hope this makes a difference. Also I think I might add more flour, I think it might not have enough to hold up for what I want it to do. Although I do know that this time was better than the last time I made it. I’ve made this recipe a total of like three times, and the first was HORRIBLE, the second better, and the last time was in the dead middle of summer and the heat was TERRIBLE, so the butter in the frosting was like *slunk” and just slid off when it had to travel in a vehicle with NO AIR CONDITIONING. Yuck. I’ll keep ya posted about it. (It will not be the Watermelon Cake.)

Choclate Cupcakes with Blue Vanilla Buttercream8 (2)

These cupcakes were really good otherwise though. People at work liked them, and my sister gobbled them up (when doesn’t she?) so despite my lapse in baking judgement for using store bought cake mix – they turned out well. I haven’t used a box cake mix since then, despite there being three currently sitting in my pantry.  One’s a yellow cake mix, one chocolate and the other is carrot cake, complete with a frosting can (ew) to go with it. I have no urge to ever use the box. It’s really there for when I need a super quick backup.

Well, that’s it for this post. Until next time –

JessiChoclate Cupcakes with Blue Vanilla Buttercream12

It was two days past my eighteenth birthday, a day I consider one of the absolute worst days of my life – the day my father died. That was seven years ago – and this blog is not about my father. It’s about something I’m sure that people have made forever – even if you’ve never tried it.

IMAG1628

It’s a simple thing, really, but one of my favorite meals  that my father used to make. So when I make it these days – sometimes, I think of my dad.

Like I said, it’s simple, super easy, something you could do with your kids seeing as how my dad did it with me. Hotdogs wrapped in biscuits. See, super easy? Of course, the prep is like ten minutes, maybe less if you’ve done it so many times and have everything ready.

Important things to know – Get the buttermilk ones with the little flavor butter melts throughout the biscuit, not the flaky layer biscuits, those are horrible for these.  And I do mean horrible, you get unsatisfactory results, even though they’d pretty much taste the same if you did. You can also use croissants if you like, but I find the biscuits taste better. My dad used to use croissants when he made these in the morning with sausage (but not breakfast sausage, like polish sausage) and called them kolaches or something like that.

Sometimes when you bake these, the ends come undone, but it still tastes good. I hope you enjoy. I like to eat mine with ketchup.

Ingredients:

1 package of  hotdogs (8)
1 package of buttermilk biscuits (8)
8 slices of American cheese

Utensils:
1 cutting board
1 sharp knife for cutting
1 rolling pin
2 cookie sheets
Non-stick cooking spray

Directions:

1) Preheat oven to 375°F and spray one cookie sheet with non-stick cooking spray. Put the other cookie sheet under the one you just sprayed. This prevents your biscuit bottoms from burning.

1) Pull all of the hot dogs out of the package and make lengthwise incisions down each hotdog.

2)Unwrap the cheese slices and then open the slits on the hotdog and place the cheese into them so that they kind of hang out of the hotdog.

3) Open the biscuits and place them on the cutting board. Roll out the biscuits one way first and then only slightly the other way so they make a oblong shape, this is important. You don’t want a nice round circle, unless you want to experiment and make your own version of a corn dog without the dipping and frying.

4) Place the hotdog with the cheese on one side, and roll it up, making sure to press slightly at the end as sort of a seal. Put the rolled up hotdogs on the cookie sheet and bake them for 12 to 15 minutes until the tops are golden brown.

5) Let cool a couple of minutes and then serve. I eat them with ketchup. Yum!


Like I mentioned, this dish, while SUPER simple, and anyone can make, you’ve probably made it yourself before, reminds me of my father, which was the whole intention of posting this today.

I miss my father, a lot. I think of him often enough, like, everyday. So Daddy, I miss you and I love you. This post is for you.

Until next time –

Jessi

Long time, no see, right?

It’s been nearly a year since my last update, so I should, concievably, have a lot to post, right? Well I probably do and I just can’t remember. Whatever. This is just a quick update in case anyone actually follows this.

If I had a proper kitchen, this would probably be updated frequently. But I hate my kitchen and ever since my best friend moved in, there’s even less room. But we’ll see about getting better at updating this thing. *sigh*

Life Update: No, I’m not dating anyone knew. No, I don’t have a job doing what I love, writing OR baking. Which sucks. BUT, I am moving next month from Michigan to Texas. BIG CHANGE. That’s mostly what this next month is going to focus on. I also just quit my job working midnights as a cashier at a localized to the Midwest retail store.

So expect a few updates coming – baking ones. Because I don’t have anything on the writing front which I’ve never kept updated anyway. Actually, I might return to my research for that one book that THERE is a post about. If you wanted to go look it up in archives. If I update about that, I’ll post a link then.

Until next time, toodles.

~Jessi~

This cake was my first cake that I was PAID to make. And despite several setbacks, it turned out well, I think.

Sherri Aaron Bridal3

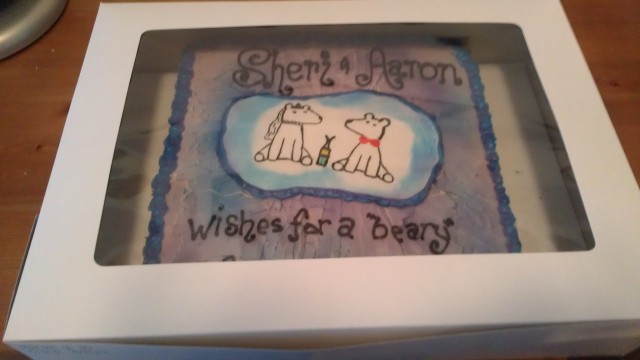
Trisha, one of my mom’s co-workers, saw my Game of Throne’s cupcakes – my mom shows off my stuff at work – and wanted to order a bridal shower cake for her friend Sherri for April 20th. So as you can see, I’m not too late in getting this up as I am on the other ones. She wanted a plain sheet cake made of marble for 30 people and the colors blue and purple with the words “Sheri & Aaron, here’s to a ‘beary’ happy life together.” Sheri likes polar bears and the couple likes Jones soda.

Sadly, the design I made wasn’t what I wanted – meaning it didn’t turn out like my sketch. Originally it was supposed to have 3D modeling chocolate figures of an iceberg with two polar bears and a bottle of Jones soda between them, one was going to wear a veil, and the other a bow tie.

Trisha reported back to my mom, who told me that they LOVED that cake, but the frosting was too sweet. Which sucked. But I didn’t really like the recipe I used anyway. I’m going to show you the recipe, but please don’t use it unless you want a sugar overload. Like a major one.

But, I had three batches of modeling chocolate fail on me – not even kidding. Seriously. The quality of the chocolate was good, so I know it wasn’t that, the only thing I can conclude was that I had terrible quality of corn syrup. After three failed attempts at trying to make modeling chocolate – I went with my fail safe back up. Fondant.

The cake I used, was two of my favorites – ironically the chocolate and the yellow cake both had the same baking time and oven temperature. It was the yellow cake I used for my sister’s birthday cake and the chocolate one I apparently use for everything else. It was SO good, according to feedback. I’ll have to be sure to use it more.

I had to use fondant for the little design, and I had to hand paint it, which is no biggie, except that you only get one shotSherri Aaron Bridal4 at it sometimes. Luckily, I only needed one shot because it turned out really cute. I was happy with the way the 2D design turned out, but majorly pissed that I couldn’t get the 3D to work out. I just ran out of time. I used my standard Marshmallow fondant recipe – if you’d like to see it please visit my Modest Medusa blog I wrote.

Jessi’s Favorite Cake

Ingredients:
2¼ cups all-purpose flour (do not sift the flour)
1½ cups granulated sugar
3½ teaspoons baking powder
1-teaspoon salt
1¼ cups milk
Vegetable oil
1 stick butter (not margarine), softened
1-tablespoon vanilla extract
3 large eggs

Important Note: Measure the 1-1/4 cups of milk in a 2 cup measuring cup….then add enough vegetable oil to bring the liquid up to 1 1/3 cups.

Preheat oven to 350°

Process:
Preparation: Cut wax paper to fit the bottom of (3) 9 x 1 1/2-inch round pans. Spray the pans with cooking spray, place the wax paper in the pans and spray the paper.

1) In a large mixing bowl combine the flour, sugar, baking powder and salt, mixing well.

2) Add the milk/vegetable oil mixture, butter and vanilla to the flour mixture and beat with an electric mixer on medium to medium-high speed for 2 minutes, scraping sides of bowl as needed.

3) Add the eggs and continue beating an additional 2 minutes. Pour batter into prepared pans.

4) Bake at 350° for 20 to 25 minutes or until a wooden pick inserted near center of cake comes out clean, or until cake springs back when touched lightly in the center.

Cool cakes on wire racks for 15 minutes; remove from pans and cool completely.

Frost as desired.

And…

Jessi’s Favorite Chocolate Cake

For Layer Cake:

Ingredients:

3 cups flour

2 cup granulated sugar

2 teaspoon baking soda

2 teaspoon salt

2/3 cup cocoa powder

1 cup oil

2 cup water

2 teaspoon vanilla extract

2 tablespoon vinegar

Directions:

1)       Preheat oven 350 degrees F

2)       Mix flour, sugar, baking soda, salt and cocoa powder in a bowl together. Combine oil, water and vanilla in a bowl as well, keep vinegar separate until final mix together.

3)       Put in prepared pans and bake for 30 – 35 minutes.

4)       Frost with icing or buttercream when cooled completely

The chocolate cake recipe is from that Mom’s Chocolate Cake Recipe that I talked about in Sorry They’re Late Birthday Cupcakes. I’ve recently made my own personal little cookbook, and I renamed all the recipes, so they’re no longer saved with their original names. I’d tell you if I made something up myself.

I made the icing with the following recipe, but again, I urge you NOT to use this. It’s overly sweet – and while the lemon extract helps a little, it’s not worth anything much.

Vanilla Buttercream
Ingredients
• 1/2 cup butter, softened
• 3-1/2 cups confectioners’ sugar
• 1-1/2 teaspoons vanilla extract
• 5 to 6 tablespoons 2% milk
• Splash of lemon extract
Directions
• In a large bowl, cream butter until light and fluffy. Beat in the confectioners’ sugar, vanilla and enough milk to achieve desired consistency. Yield: About 3 cups.

This actually a modified recipe from the original and it still sucks.

For the design, I made a design of strokes on the cake all heading to the center, which makes it looked like cracked ice, which was the only way I could get the iceberg feel to it, although the fondant is shaped like an ice floe. It effect turned out nice, I was happy with that. Now, I don’t own an airbrush, it’s on my list of things to buy for my cake decorating supplies, so I had to use that Wilton spray mist color, which has the same effect as air brush. And then I had to mix up some more frosting so that I could make the edge design. I mixed up blue and purple and then put them in the same bag to make it look like a tie-dye job a little, so that both colors would be there and one wouldn’t be more prominent than the other. And then of course I wrote on it in black so the words would stand, because I have pretty nice penmanship with icing. I can do print, fancy or cursive.

Sherri Aaron Bridal1

If you didn’t pick the cake up and support in the middle, there was a cracked looked to the airbrush surface, which kind of worked for this cake though. Thankfully. Anywyay Trisha was happy, and so was Sheri with the design, and I of course lowered my price since I couldn’t make the 3D figures the way she wanted.

So that’s my latest cake escapade – until next time!

Jessi

The Modest Medusa Cake

Before you look at any pictures, I should tell you about Modest Medusa. Modest Medusa is a webcomic written and drawn by Jake Richmond, that features mostly about people in his real life, aside from Medusa, who is of course, NOT real, seeing as how she’s a sea monster type thing. Whatever, she’s adorable.

To explain properly, so that you understand the cake, Medusa is from a magical realm that doesn’t really exist, and she came into Jake’s world (our world) through a toilet. Medusa’s bed is a toilet and she loves Chocodiles – for those of you who don’t know what a chocodile is, it’s a chocolate covered twinkie, and apparently they do (did) exist. They stopped making them when they stopped making twinkies (duh!), so I will hopefully get to try one in my lifetime when they start producing twinkies again. The joke about chocodiles and Medusa are that, she LOVES them, and she lives in a toilet, and that chocodiles apparently look like a piece of crap. So when you see the picture below, it’s a CHOCODILE – not a piece of s**t.

Amy's Birthday Cake, Modest Medusa

Amy’s Birthday Cake, Modest Medusa

I made this cake for my sister Amy’s birthday, because she loves Modest Medusa, and now so do I. So thank you for that, Amy, thank you.

Now, the only part of this cake that is cake is the toilet bowl itself and the chocodile, the back and Medusa herself are actually made from rice krispies. I should have taken a photo showing you the inside of the cake, because it’s purple funfettied, because that’s Amy’s favorite kind of cake and her favorite color is purple.

The cake I used this time, I searched the internet long and hard to find just the right one, and let me tell you – this cake is PERFECT. At least for me. I don’t remember the name of the cake before I renamed it for my cookbook – just that I didn’t come up with the recipe.

The Chocodile (chocolate covered twinkie) and Sneaky Snake

The Chocodile (chocolate covered twinkie) and Sneaky Snake

Jessi’s Favorite Cake

Ingredients:
2¼ cups all-purpose flour (do not sift the flour)
1½ cups granulated sugar
3½ teaspoons baking powder
1-teaspoon salt
1¼ cups milk
Vegetable oil*
1 stick butter (not margarine), softened
1-tablespoon vanilla extract
3 large eggs

*Important Note: Measure the 1-1/4 cups of milk in a 2 cup measuring cup… then add enough vegetable oil to bring the liquid up to 1 1/3  cups.

Preheat oven to 350°

Process:
Preparation:
Cut wax paper to fit the bottom of (3) 9 x 1 1/2-inch round pans. Spray the pans with cooking spray, place the wax paper in the pans and spray the paper.

1) In a large mixing bowl combine the flour, sugar, baking powder and salt, mixing well.

2) Add the milk/vegetable oil mixture, butter and vanilla to the flour mixture and beat with an electric mixer on medium to medium-high speed for 2 minutes, scraping sides of bowl as needed.

3) Add the eggs and continue beating an additional 2 minutes. Pour batter into prepared pans.

4) Bake at 350° for 20 to 25 minutes or until a wooden pick inserted near center of cake comes out clean, or until cake springs back when touched lightly in the center.

Cool cakes on wire racks for 15 minutes; remove from pans and cool completely.

Frost as desired.

Now, this version already has all my notes that I’ve made that I would change. Or that needed to be added. It’s important to note however, that this batter will not be as thick as some other cake batters you may be used to.  In fact, sometimes, it may look like the batter is trying to separate itself, don’t worry this is normal. Just go ahead and pour it into your prepared pans and bake.  The bake time may vary, though, but don’t go by me, my oven is a nightmare to work with.

I covered the whole thing in fondant, which this time I made myself.  I used Marshmallow fondant though, and I’ve had really good feedback with it. That it tastes more like actual frosting and less like fondant. People tend to dislike the taste of traditional fondant, so I like to use marshmallow.

The most important thing to remember is to have SPACE when working with fondant. And that’s my biggest issue in my kitchen. Which if you’ve ever seen my kitchen, you understand why it’s a chore. Also, if you’re going to roll out fondant for anything, you should have a long rolling pin or stick. Standard rolling pin length will only lead to trouble for you. They sell “special” fondant rolling pins or whatever… I went to my local “Hobby Lobby” and bought a  2″ thick dual, cut off some of the excess  length and it works perfect.

Marshmallow Fondant

Medusa and her bed, the toilet with her Chocodile.

Medusa and her bed, the toilet with her Chocodile.

Ingredients:

¼ cup butter

1 (16ounce) package miniature marshmallows

¼ cup water

1 teaspoon vanilla extract

2 pounds confectioners’ sugar, divided.

Directions

  1. Place the butter in a shallow bowl, and set aside.
  2. Place the marshmallows in a large microwave-safe bowl, and microwave on High for 30 seconds to 1 minute to start melting the marshmallows. Carefully stir the water and vanilla extract into the hot marshmallows, and stir until the mixture is smooth. Slowly beat in the confectioners’ sugar, a cup at a time, until you have a sticky dough. Reserve 1 cup of powdered sugar for kneading. The dough will be very stiff.
  3. Rub your hands thoroughly with butter, and begin kneading the sticky dough. As you knead, the dough will become workable and pliable. Turn the dough out onto a working surface dusted with confectioners’ sugar and continue kneading until the fondant is smooth and no longer sticky to the touch, 5 to 10 minutes.
  4. Form the fondant into a ball, wrap it tightly in plastic wrap, and refrigerate overnight. To use, allow the fondant to come to room temperature, and roll it out onto a flat surface dusted with confectioners’ sugar.
Medusa

Medusa

Also, important to remember, always keep your fondant moving when rolling it out. ALWAYS. Roll it out, move it, roll a little more, move it, and keep your confectioner’s sugar handy. While kneading it, you’ll come across a lot of wet spots, frequently, just add more powder sugar until it comes to the right consistency to roll out. You’ll know when you get there. You color fondant by adding color and kneading until it’s a uniform color, this could take more time than you anticipate, but it’s worth it.

For Medusa, she’s all one color, and I painted her hair, although originally, it was supposed to rise, but I ran out of time and resources. Had to improvise. But she turned out alright and I’m happy with her. Mostly.

Until next time –

Jessi

If you would like to read the webcomic “Modest Medusa Webcomic” click here, and it will start you from the first comic. Be warned, there are three seasons currently as of May 1, 2013.

Okay, this one will be quick. Like really quick. And full of mostly pictures.

If you’ve read my blog before, then you’ll know that I am a HUGE Harry Potter fan – seriously, a lot of my fan fictions (okay like mostly all of them) are about Harry Potter. And my friends all know me well enough to know that I LOVE Harry Potter, so what kind of birthday cake does Spalding make me? That’s right, Harry Potter.

IMAG1272

It turned out EPIC. I’m in love with it. Too bad I had to eat it, but I couldn’t let it go to waste, that would have been a sin. Seriously, if you read this, Spalding, I LOVE YOU. It was a chocolate cake in some pieces and marble in the others. The chocolate by itself tasted better than the marble. The frosting, also chocolate, was really good as well. I can’t really say much other than to ramble on about how awesome my birthday cake was.

Keep in mind, that it is now May, and my birthday was March 15. Totally me to wait a month and a half to get this blog post up, right? Yeah, that’s me. Anyway. One day, I’ll edit this post when I find Spalding’s blog again. Or her website – something like that to direct you to her if you wanted her to make you a cake, however, she operates out of Ohio, so you’d have to be pretty close to her to get a cake. She lives and hour away from me.


IMAG1284 IMAG1285 IMAG1273 IMAG1281


Speaking of which… she totally did not give me my Christmas cookies. Jerkface. Just kidding, I love you Spalding.

Until next time –

Jessi


I’m late, very late. These cupcakes I am about to show you… were made on March 4. And today is the last day of April, yikes! I have to get better at this.

Handpainted Edible Game of Thrones Shields on White Chocolate Buttercream & Peanut Butter Filled Chocolate Cupcakes.

Handpainted Edible Game of Thrones Shields on White Chocolate Buttercream
& Peanut Butter Filled Chocolate Cupcakes.

I made some Game of Thrones cupcakes for my best friend, Fred’s, birthday. Actually, me and my old school buddy, Carolyn Spalding (whose amazing with cakes as well) kind of partnered up and made him a joint cake and cupcake pair of

Targaryen House Shiled from Game of Thrones as a cake

Targaryen House Shiled from Game of Thrones as a cake

birthday awesomeness. And Fred LOVED it. I made the cupcakes, Spalding (as she will be known as) made Fred a cake.

If you watch or have read Game of Thrones, then you’ll understand the photos. I had not gotten into Game of Throne’s as of yet when I made these cupcakes, in fact, I’m just now getting into it after a three hour conversation on facebook with Fred about it. Now, I appreciate these cupcakes even more that I know what the crests are. Ironically, the cake and the cupcakes I did my hardest to get right were Fred’s favorite house. Seriously, that’s ironic, because neither Spalding nor I knew that.

I’d like to say that I used some new and great recipe to make them, but instead I used my old favorite chocolate cake recipe, but hey, stick with what you know works when you’re in a bind, right? I had limited time by the time I got these crests painted, and I knew that Fred liked chocolate. I filled the yummy cupcakes with a peanut butter filling, which was also ironic because Spalding and I did not coordinate that, and she made a chocolate peanut butter frosting for the cake. Seriously, she and are just in tune or something, because we both came up with the idea as well. Anyway – they turned out awesome.

Game of Throne's cake and cupcakes

Game of Throne’s cake and cupcakes

I also used my favorite white chocolate buttercream recipe, the one called “The Only Other Frosting You’ll Ever Need” or something like that. I can’t remember, it’s saved in my recipe book as White Chocolate Buttercream. At any rate, Fred LOVED them, and that was all that mattered. Both of these recipe’s can be found in my “Sorry They’re Late Birthday Cupcakes” I made last year for my sister in November.

And also, I’m glad you had an awesome birthday, Fred, and that you loved your cake and your cupcakes, even if you couldn’t finish all the cake by yourself.

IMAG1263

Fred with his birthday cupcakes – he turned 25.

Alright, so what Spalding and I did was that we came up with the concept (actually, I suggested a Game of Throne’s cake, and Spalding came up with the idea of using the Targaryen house for the main cake, and for me to make fondant shields to put on top of the cupcakes), and then she baked and sculpted and frosted and fondanted her cake and drove an hour up to where I live up here near in the (way far) suburbs of Detroit. I wasn’t working at the time, so it made it very easy to find the time to make Fred’s cupcakes. Or shields, whatever. First I had to cut the shapes out, so that they all looked the same size, and I didn’t have anything to actually make into the shape, so I had to do it all by hand. Admittedly, I did take the easy way out and buy store made fondant – I know, I know. I didn’t trust my own fondant skills at that point, and my shoulder was still injured, I was trying to make it easier. Regardless, it worked out well, because store bought fondant seems to be stiffer, which is what I needed. So I hand cut all the shields and smoothed down the edges.

Game of Thrones Birthday Cake and Cupcakes

Game of Thrones Birthday Cake and Cupcakes

Then I had to look at all my food dye colors and decide what colors would work best on what shields. I couldn’t get all the shades perfect, like I wish I could have, but in the end, Fred was pretty thrilled, so that’s what counted. I had to hand paint every shield, and the one that I’m the least pleased with was “Greyjoy.” I wish I could redo that one. But it was one of the last ones I did, so I was kind at the point where you just go, “I just want to finish this already.” Not that that’s any excuse at all. But that one is MY least favorite.

My favorite, and Fred’s, was Targaryen. The three headed dragon shield. Awesome is exactly how those turned out. =)

Here are all the house shields that I had to handpaint myself – which took me HOURS. Not even kidding.

House of Targaryen

House of Targaryen

House of Baratheon

House of Baratheon

House of Stark

House of Stark

House of Lannister

House of Lannister


House of Arryn

House of Arryn

House of Greyjoy

House of Greyjoy

House of Tully

House of Tully

House of Frey

House of Frey


Until next time –

Jessi